Wednesday, December 27, 2006

shell script using expect for cvs automation

Hello PPL,

I always have to check the cvs status using cvs status command, so I tried to automate these things using expect
Expect is a tool for automating interactive
applications such as telnet, ftp, passwd, fsck, rlogin, tip, etc. Expect really
makes this stuff trivial. Expect is also useful for testing these same
applications. And by adding Tk, you can also wrap interactive applications in
X11 GUIs.
Home page http://expect.nist.gov/

#!/bin/bash

status=$(expect -c "spawn cvs -z9 -d :ext:blog@cvshostname:/path/cvsroot status
expect {password: { send \"password\r\"; exp_continue }
}
exit
")
echo ""
echo "$cvsstatus" > cvsstatus.txt

###continue your shell script after here####

####exit from script#######

Same you can use with ssh, telnet or ftp.
Let me know if some one have better thing with expect package because I am also new with scripting and expect :(

Thanks

Wednesday, October 18, 2006

what is superblock and how to recover it

Hello EB,

The scope of this article not covers about the basic things about file system, but its about troubleshooting of currupt file system.
So, when you create file system on hard drive it will sub devided into multiple file system blocks.
Blocks are used for -
1. To store user data
2. Some blocks used for to store file system's metadata.
(Metadata is kind of structure of your file system and it contents superblock, indoes and directories)

Superblock - Each of your filesystem has a superblock. File system like ext2. ext3 etc. Superblock contents the information about file system like -
* File system type
* Size
* Status
* Information about other metadata

Now you will guess that how important is superblock for your filesystem, if that is that currupt then you may not able to use that partition or may you will error while tring to mount that filesystem.
Following are some errors when superblock get currupts or some bad sectors
- You cant able to mount the filesystem, it will refuse to mount
- Filesystem gets hang
- Sometimes though you are able to mount that filesystem, but strange behavior occures.

These kind of errors occures because of bunch reasons. Most of the time fsck works fine for these errors -
$e2fsck -f /dev/hda3

(-f option for forcefully checking even filesystem seems clean)

Now fsck doesnt work because of lost of superblock, what you will do??
Note that Linux maintains multiple redundant copies of the superblock in every filesystem. You can find out this information with this following command -
$dumpe2fs /dev/hda6 grep -i superblock
dumpe2fs 1.32 (09-Nov-2002)
Primary superblock at 1, Group descriptors at 2-2
Backup superblock at 8193, Group descriptors at 8194-8194
Backup superblock at 24577, Group descriptors at 24578-24578
Backup superblock at 40961, Group descriptors at 40962-40962
Backup superblock at 57345, Group descriptors at 57346-57346
Backup superblock at 73729, Group descriptors at 73730-73730

To repair file system by alternative superblock
$e2fsck -f -b 8193 /dev/hda6

(Take backup using dd before doing running commands)

If you are using Sun Solaris, as My experience frequent power failure can get you hell :-( . I am using old sparc and one time in month I have run fsck using commands as per my last blog. So if your Sun Solaris lost the superblock then boot from cdrom or network, to retrive information about your filesystem's superblock give following command -
$newfs -N /dev/rdsk/devicename

Now use alternative superblock
$fsck -F ufs -o b=block-number /dev/rdsk/devicename

okie guys, hope this information helps somebody.

Tuesday, October 17, 2006

smb partition mounting using mount command

Hello EB,

Here is the useful commands when you want to browse the smb shared files using user name, password and even you can specify specific domain -

smbclient -W domain -L smbhost(IP) -U vishalh
mount -t smbfs -o username=amolk,password,workgroup=domain //smbhost(IP)/share /mnt

Wednesday, October 04, 2006

Sun Solaris - Solution for fsck error at boot time

Hello EB,

Most of time we get some problems with Sun solaris machines at boot time, generally it because of bad sectors or damaged file system. Machine go into File system repair option, so deal with these kind of problems use following commands -

fsck -F (ufs/vxfs) /dev/rdsk/(partition)

noninteractive :fsck tries to repair all the problems it finds in a file system without stopping for user response useful in case of a large number of inconsistencies in a file system but has the disadvantage of removing some useful files which are detected to be corrupt .
If file system is found to have problem at the booting time non interactive fsck fsck is run and all errors which are considered safe to correct are corrected. But if still file system has problems the system boots in single user mode asking for user to manually run the fsck to correct the problems in file system

fsck -F (ufs/vxfs) -Y /dev/rdsk/(partition)

Please use this option at your own risk because it will consider "yes" option for every qwestion so your filesystem might get modified.
Some fsck options as follows -

fsck [ -F fstype] [-V] [-yY] [-o options] special
-F fstype type of file system to be repaired ( ufs , vxfs etc)
-V verify the command line syntax but do not run the command
-y or -Y Run the command in non interactive mode - repair all errors encountered without waiting for user response.
-o options Three options can be specified with -o flag
b=n where n is the number of next super block if primary super block is corrupted in a file system .
p option used to make safe repair options during the booting process.
f force the file system check regardless of its clean flag.
special - Block or character device name of the file system to be checked/repaired - for example /dev/rdsk/c0t3d0s4 .Character device should be used for consistencies check & repair
phases:
fsck checks the file system in a series of 5 pages and checks a specific functionality of file system in each phase.
** phase 1 - Check Blocks and Sizes
** phase 2 - Check Pathnames
** phase 3 - Check Connectivity
** phase 4 - Check Reference Counts
** phase 5 - Check Cylinder Groups

Wednesday, September 06, 2006

Benchmark chart of Linux v/s Windows


Hello EB,

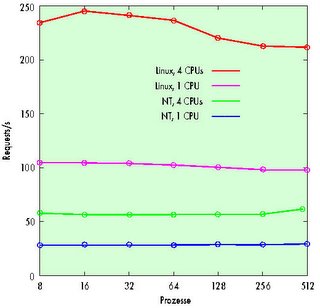
I have both Linux and windows while running webserver. In this senario, the overall size of one million files was about twice as large as the 2 GB of main memory. The total number of requests in test runs for which a reboot had previously cleared the buffer cache was clearly below 500,000. Files would generally have to be loaded from hard disk before being sent through the net.
In this setup, the freeware system clearly shows better results: While NT can hardly manage more than 30 requests per second, Linux can handle more than 166. With 512 client processes, it even manages 274 pages per second. Since more than 400,000 pages are retrieved during this test, however, we cannot be entirely sure that the increase especially towards the end of the graph isn't down to a caching effect. But who would complain about an overly efficient buffer cache?
When calling CGI scripts, Windows NT is no match for Linux. As the load is not confined to kernel mode in this case, Linux can benefit from additional CPUs. The graph at the bottom nicely depicts the linear increase for a CGI script with integrated delay.

Wednesday, August 30, 2006

Remote installation of RHES4 64bit

Remote installation of RHES4.2 64bit -

If that server is already having redhat version installed –

1. Copy kernel and initrd image in /boot directory (In my senario I already made RHES4u2.tar.gz gz file using /remoteinstall/Redhat4update2/images/pxeboot/* on my file server , you can use 1st CD of RHES4update2 top copy the kernel and initrd image)
172.30.0.62 - This is my file server

scp username@173.30.0.62:/remoteinstall/Redhat/RHES4u2.tar.gz
tar -xvzf RHES4.u2.tar.gz
cp pxeboot/* /boot/

2. Edit the /etc/grub.conf file. Go onto next line of splash image.
title rhes4
root (hd0,0)
kernel /vmlinuz vnc vncconnect=172.30.0.3 headless ip=172.30.0.127 netmask=255.255.255.0 gateway=172.30.0.1 dns=172.30.0.41 ks=http://172.30.0.131/ks4.cfg
initrd /initrd.img

Save the file and reboot the machine.

3. Now start you vncviewer into listen mode.
(Make following changes
1.Replace 172.30.0.3 ip with your desktop’s ip
2. Replace 172.30.0.127 with to the IP of the machine which you are installing.)

My kick start configuration file looks like this -
# Kickstart file automatically generated by anaconda.

install
nfs --server=172.30.0.62 --dir=/big2/Redhat/RHES4.u2_64
lang en_US.UTF-8
langsupport --default=en_US.UTF-8 en_US.UTF-8
keyboard us
rootpw --iscrypted $1$1zTBqKn5$lnZ052YwM6uILBON/khw0.
firewall --disabled
selinux --enforcing
authconfig --enableshadow --enablemd5
timezone --utc Asia/Calcutta
bootloader --location=mbr --append="rhgb quiet"
# The following is the partition information you requested
# Note that any partitions you deleted are not expressed
# here so unless you clear all partitions first, this is
# not guaranteed to work
clearpart --all
part /boot --fstype ext3 --size=100
part /usr --fstype ext3 --size=15000
part / --fstype ext3 --size=5000
part /opt --fstype ext3 --size=2000
part /var --fstype ext3 --size=2000
part /tmp --fstype ext3 --size=2000
part swap --size=2000

%packages
@ compat-arch-development
@ admin-tools
@ system-tools
@ dialup
@ compat-arch-support
@ legacy-software-development
@ base-x
@ development-tools
e2fsprogs
kernel-devel
kernel

%post

Hope this will help somebody :)

Thursday, August 24, 2006

rpm options

Hello EB,

rpm is a powerful Package Manager, which can be used to build, install, query, verify, update, and erase individual software packages. A package consists of an archive of files and meta-data used to install and erase the archive files. The meta-data includes helper scripts, file attributes, and descriptive information about the package. Packages come in two varieties: binary packages, used to encapsulate software to be installed, and source packages, containing the source code and recipe necessary to produce binary packages.

Now most of famous distribution used rpm packages like redhat, suse and even lot free distributions like white box.

Following are some but basic option for rpm command -

rpm {-i--install} [install-options] PACKAGE_FILE ...
rpm {-U--upgrade} [install-options] PACKAGE_FILE ...

  • Sometimes you want to know which library uses which rpm packages or vice versa one rpm packages installs which libraries

#rpm -qf /usr/lib/libstdc++-2-libc6.1-1-2.9.0.so
compat-libstdc++-7.3-2.96.128

#rpm -ql compat-libstdc++-296-2.96-132.7.2
/usr/lib/libstdc++-2-libc6.1-1-2.9.0.so
/usr/lib/libstdc++-3-libc6.2-2-2.10.0.so
/usr/lib/libstdc++-libc6.2-2.so.3

  • Most of time you want to uninstall some rpm packages and you use rpm -e but it says there multiple packages are exist use

rpm -e --allmatches {rpm name}

Let me know if you have any queries with rpm commands,

hope these information will help you.

Thanks

Tuesday, July 18, 2006

Free E-Books To Download

Hello Guys,

Check out this kool link for free e-books to download till 4th August 2006.
So hurry...

http://worldebookfair.com/Technical_eBook_Colleciton.htm

Cheers,

Thursday, July 06, 2006

Desktop Linux Edition from Xandros


Xandros Desktop Home Edition - Premium is a complete Linux desktop operating system that also includes the applications needed to work, communicate and play. Built on the stable and reliable Debian Linux platform, Xandros Desktop allows you to enjoy your digital lifestyle, the way you want to, without the hassles of viruses, spyware and other security threats. Xandros is fun and easy to use. It installs in just 4 clicks, and does not require any Linux or technical know-how. Discover how easily you will enjoy the benefits of Linux and bring security and stability you can count on to your PC with Xandros Desktop.
Music · Photos · Video · Web · E-mail · Multimedia
The new home for your digital life is ready. From web surfing to auction bidding, photo taking to album making, video streaming to iPod syncing and e-mailing to online banking… Wherever your digital life may take you, Xandros Desktop is the secure and exciting gateway to your digital world.
For more information - www.xandros.com

Redhat Made It Easy


Redhat made it easy.

You know Linux is reliable. You know it has security you can trust. In fact, nearly half of medium-sized businesses rate moving to Linux as either important or very important.* With the right experience and expertise, you can make the move, too.

The reputation of Linux in enterprise environments is rock solid. For its performance it has attracted some of the largest financial institutions. For its security it has been adopted by governments around the globe.

We believe small and mid-sized companies should have every advantage that the largest companies have with their technology: Performance, reliability, affordability, room to grow. Without compromise.

Redhat made it easy.

Keybank
Dave Seager
VP Manager of UNIX systems

Keybank is the 16th largest financial institution in the US with approximately 2000 branches and 22,000 employees. They needed to consolidate existing platforms and build bridges between existing systems. They looked at all the other Linux companies but quickly realized that Red Hat is the market leader and that there was no comparison. They also realized that running Red Hat Enterprise Linux 4 on Intel-based platforms gave them the best overall solution providing the highest performance, best cost savings, and the most choice.

Tuesday, July 04, 2006

Advantages to Linux Web Hosting

What are the Advantages to Linux Web Hosting?

* Stability: Linux/Unix operating systems are very stable and robust. A web site housed on a Linux operating system will excellent up-time (of the order of 99.9%). Of course, other factors such as power supply, network operating center, and network load etc. also matter when it comes to maintaining the system uptime.
* Cost Effective: With Linux OS, there are no licensing fees as opposed to it's competitors. The Linux OS comes free of cost (or at very insignificant cost, usually cost of distribution). Free server applications such as FTP, Web Server, DNS Server, and File Server are also very stable. PLETH recommends the PLESK™ Control Panel (which does require licensing) for all of our web hosting accounts simply because it adds usability and flexibility to our clients. (see additional PLESK™ Control Panel information below)
* Compatibility: All types of file extensions (or scripts) can be used when using Linux web server. Commonly, the following extensions are supported: .cgi, .html, .htm, .pl, .php, .shtml, .asp (requires additional plug-in), .xml, and others as well as support for Microsoft Frontpage Extensions.
* Portability and Scalability: A web site designed to be hosted on a Linux based web server can be hosted on a Windows web server easily, where as the reverse is not always true. This provides flexibility for future growth.
* Most widely used and supported: Linux/Unix based web hosting is by far the most widely used OS in comparison to Windows based web hosting, and technical support can be a lot easier to locate should it be required.
* Scalability: A web site is dynamic. Usually, a web site starts with a few pages of html and grows over a period of time to suit our customers requirements. It is preferable to design a web site keeping this requirements in mind. A web site designed for compatibility with a Linux/Unix based web server meets the scalability requirement easily without making any site wide design changes.

What is web hosting

What is the web hosting?

Web hosting is a service that provides individuals, organizations and users with online systems for storing information, images, video, or any content accessible via the Web. Web hosts are companies that provide space on a server they own for use by their clients as well as providing Internet connectivity, typically in a data center. Web hosts can also provide data center space and connectivity to the Internet for servers they do not own to be located in their data center.


Types of hosting

FREE HOSTING :- just about all the free web hosting available is extremely limited when compared to paid hosting. Free web hosts generally require their own ads on your site, only allow web-based uploading and editing of your site, and have very tight disk space and traffic limits. Still, most people get their start via free web hosting

IMAGE HOSTING :- hosting only a few different formats of images. This type of hosting is often free and most require registrations. Most image hosts allow hotlinking, so that you can upload images on their servers and not waste space/bandwidth on yours.

SHARED HOSTING :- one's Web site is placed on the same server as several hundred other sites. A problem with another site on the server can bring all of the sites down. Shared hosting also brings with it some restrictions regarding what exactly can be done, although these restrictions are nowhere near as restrictive as for free hosting.

RESELLER HOSTING :- designed for those who want to become Web hosts themselves. One gets a large amount of space and bandwidth that can be divided up among as many sites as the user wants to put on his account. A reseller account is placed on the same server with other reseller accounts, just like with shared hosting but there are fewer accounts.
DEDICATED HOSTING: With dedicated hosting, one gets a server of one's own. They have no restrictions, except for those designed to maintain the integrity of the Web host's network (for instance, banning sites with adult content due to the increase risk of attack by crackers and grey legal issues for the ISP). Unless a separate plan is purchased from the host, the user is also generally on his own. This can be an expensive proposition, as the purchase of the dedicated server itself is generally far more expensive compared to shared hosting.

COLOCATED HOSTING :- This involves a server the user purchases himself and installs at the host's data center. Besides unmonitored reboots, the user must pay extra for many services dedicated hosting provides by default. Colocated hosting is generally chosen by people with server administration experience and those with more significant needs than which can be satisfied by dedicated or shared hosting. This is usually the most expensive and least cost effective option if you are not colocating many servers


Linux Hosting is considered to be one of the most stable and reliable hosting platforms around. It also has the additional advantages of not having to be licenced, being flexible, and supporting most programming languages.

What is the difference between Linux hosting and Windows hosting?

If you need to support Microsoft products such as ASP, ASP.NET, MS SQL, or VBScript or IIS, then Windows hosting fits your needs.
Linux is much more common with web hosts because of its stability and because it’s free. Therefore, Linux hosting is usually cheaper than Windows.

What are PHP, ASP, Perl, MySQL, MS SQL?

PHP - PHP: Hypertext Preprocessor, server side language
ASP - Active Server Pages, server side language
Perl - server side language
Each programming language has its own benefits and uses.
MySQL and MS SQL are database systems that you can use a database to organize your data.

Wednesday, June 28, 2006

IBM TotalStorage SAN256B


IBM TotalStorage SAN256B

* High availability with built-in redundancy designed to avoid single points of failure
* Highly scalable director with 16 or 32 ports per port switch blade, and from 16 to 256 ports in a single domain
* Multiprotocol router blade with sixteen Fibre Channel (FC) ports and two Internet Protocol (IP) ports for SAN routing and distance extension over IP

* Port switch blades support FICON® Director switching with Fibre Channel/FICON intermix, FICON CUP (Control Unit Port) and FICON cascading
* Interoperable with other IBM® TotalStorage® SAN b-type switches and directors
* Offers advanced security with comprehensive policy-based security capabilities
* Offers advanced fabric services such as end-to-end performance monitoring and fabric-wide health monitoring

The IBM TotalStorage SAN256B, with next-generation director technology, is designed to provide outstanding performance, enhanced scalability and a design ready for high performance 4 Gbps capable hardware and expanded capability features. The SAN256B is well suited to address enterprise SAN customer requirements for infrastructure simplification and improved business continuity.
IBM TotalStorage SAN256B fabric switch
Improved port density enables up to 256 ports in 14U vertical rack space to maximize datacenter efficiency

The SAN256B director interoperates with other members of the IBM TotalStorage SAN b-type family. It can be configured with a wide range of highly scalable solutions that address demands for integrated IBM System z™ and open system server enterprise SANs.


Common features
· Designed for mid-range to enterprise-class SANs
· Ideal as core-component in a core-to-edge SAN fabric
· 4 Gbps industry-standard Fibre Channel (FC) switch (requires storage system hardware that supports 4 Gbps throughput)
· 4, 2 and 1 Gbps auto-sensing capability
· Fabric Operating System V5 is common across all members of the IBM TotalStorage SAN b-type family
· Advanced Inter-Switch Link (ISL) Trunking, Load Balancing and Advanced Zoning
· Web Tools, Fabric Watch, Hot Code Activation and Performance Monitor
· Optional Extended Fabric Activation, Remote Switch Activation, FICON with CUP Activation, Advanced Security Activation, FCIP Activation

Hardware summary
· Chassis includes two control processor blades plus space for one to eight port blades, dual power supplies and fans in a 14U rack height
· Available 4 Gbps 16-port and 32-port switch blades and 16-port FC/2-port IP routing blades
· 4 Gbps shortwave and longwave Small Form-factor Pluggable (SFP) optical transceivers support distances up to 500m and 35 km respectively
· Full Fabric Operation and Universal Port (E, F and FL port) operation
· Many non-disruptive software upgrades and hot-swappable switch blades, power supplies and fans
· Fabric Shortest Path First (FSPF) designed to reroute around failed links
· Option to install in IBM TotalStorage SAN Cabinet C36

Making Changes in /proc filesystem

Making changes

Detailing the exact information and usage of each file in /proc is outside the scope of this article. For more information about any /proc files not discussed in this article, one of the best sources is the Linux kernel source itself, which contains some very good documentation. The following files in /proc are more useful to a system administrator. This is not meant to be an exhaustive treatment but an easy-access reference for day-to-day use.

/proc/scsi

/proc/scsi/scsi
One of the most useful things to learn as a system administrator is how to add more disk space if you have hot-swap drives available to you, without rebooting the system. Without using /proc, you could insert your drive, but you would then have to reboot in order to get the system to recognize the new disk. Here, you can get the system to recognize the new drive with the following command:

echo "scsi add-single-device w x y z" > /proc/scsi/scsi

For this command to work properly, you must get the parameter values w, x, y, and z correct, as follows:

* w is the host adapter ID, where the first adapter is zero (0)
* x is the SCSI channel on the host adaptor, where the first channel is zero (0)
* y is the SCSI ID of the device
* z is the LUN number, where the first LUN is zero (0)

Once your disk has been added to the system, you can mount any previously formatted filesystems or you can start formatting it, and so on. If you are not sure about what device the disk will be, or you want to check any pre-existing partitions, for example, you can use a command such as fdisk -l, which will report this information back to you.

Conversely, the command to remove a device from your system without a reboot would be:

echo "scsi remove-single-device w x y z" > /proc/scsi/scsi

Before you enter this command and remove your hot-swap SCSI disk from your system, make sure you have unmounted any filesystems from this disk first.

/proc/sys/fs/

/proc/sys/fs/file-max
This specifies the maximum number of file handles that can be allocated. You may need to increase this value if users get error messages stating that they cannot open more files because the maximum number of open files has been reached. This can be set to any number of files and can be changed by writing a new numeric value to the file.

Default setting: 4096

/proc/sys/fs/file-nr
This file is related to file-max and holds three values:

* Number of allocated file handles
* Number of used file handles
* Maximum number of file handles

This file is read-only and for informational purposes only.

/proc/sys/fs/inode-*
Any files starting with the name "inode" will perform the same operation as files starting with the name "file" as above, but perform their operation relative to inodes instead of file handles.

/proc/sys/fs/overflowuid and /proc/sys/fs/overflowgid
This holds the User ID (UID) and Group ID (GID) for any filesystems that support 16-bit user and group IDs. These values can be changed, but if you really do find the need to do this, you might find it easier to change your group and password file entries instead.

Default Setting: 65534

/proc/sys/fs/super-max
This specifies the maximum number of super block handlers. Any filesystem you mount needs to use a super block, so you could possibly run out if you mount a lot of filesystems.

Default setting: 256

/proc/sys/fs/super-nr
This shows the currently allocated number of super blocks. This file is read-only and for informational purposes only.

/proc/sys/kernel

/proc/sys/kernel/acct
This holds three configurable values that control when process accounting takes place based on the amount of free space (as a percentage) on the filesystem that contains the log:

1. If free space goes below this percentage value then process accounting stops
2. If free space goes above this percentage value then process accounting starts
3. The frequency (in seconds) at which the other two values will be checked

To change a value in this file you should echo a space separated list of numbers.

Default setting: 2 4 30

These values will stop accounting if there is less than 2 percent free space on the filesystem that contains the log and starts it again if there is 4 or more percent free space. Checks are made every 30 seconds.

/proc/sys/kernel/ctrl-alt-del
This file holds a binary value that controls how the system reacts when it receives the ctrl+alt+delete key combination. The two values represent:

1. A zero (0) value means the ctrl+alt+delete is trapped and sent to the init program. This will allow the system to have a graceful shutdown and restart, as if you typed the shutdown command.
2. A one (1) value means the ctrl+alt+delete is not trapped and no clean shutdown will be performed, as if you just turned the power off.

Default setting: 0

/proc/sys/kernel/domainname
This allows you to configure your network domain name. This has no default value and may or may not already be set.

/proc/sys/kernel/hostname
This allows you to configure your network host name. This has no default value and may or may not already be set.

/proc/sys/kernel/msgmax
This specifies the maximum size of a message that can be sent from one process to another process. Messages are passed between processes in kernel memory that is not swapped out to disk, so if you increase this value, you will increase the amount of memory used by the operating system.

Default setting: 8192

/proc/sys/kernel/msgmnb
This specifies the maximum number of bytes in a single message queue.

Default setting: 16384

/proc/sys/kernel/msgmni
This specifies the maximum number of message queue identifiers.

Default setting: 16

/proc/sys/kernel/panic
This represents the amount of time (in seconds) the kernel will wait before rebooting if it reaches a "kernel panic." A setting of zero (0) seconds will disable rebooting on kernel panic.

Default setting: 0

/proc/sys/kernel/printk
This holds four numeric values that define where logging messages are sent, depending on their importance. For more information on different log levels, read the manpage for syslog(2). The four values of the file are:

1. Console Log Level: messages with a higher priority than this value will be printed to the console
2. Default Message Log Level: messages without a priority will be printed with this priority
3. Minimum Console Log Level: minimum (highest priority) value that the Console Log Level can be set to
4. Default Console Log Level: default value for Console Log Level

Default setting: 6 4 1 7

/proc/sys/kernel/shmall
This is the total amount of shared memory (in bytes) that can be used on the system at any given point.

Default setting: 2097152

/proc/sys/kernel/shmax
This specifies the largest shared memory segment size (in bytes) allowed by the kernel.

Default setting: 33554432

/proc/sys/kernel/shmmni
This represents the maximum number of shared memory segments for the whole system.

Default setting: 4096

/proc/sys/kernel/sysrq
This activates the System Request Key, if non-zero.

Default setting: 0

/proc/sys/kernel/threads-max
This is the maximum number of threads that can be used by the kernel.

Default setting: 2048

/proc/sys/net

/proc/sys/net/core/message_burst
This is the time required (in 1/10 seconds) to write a new warning message; other warning messages received during this time will be dropped. This is used to prevent Denial of Service attacks by someone attempting to flood your system with messages.

Default setting: 50 (5 seconds)

/proc/sys/net/core/message_cost
This holds a cost value associated with every warning message. The higher the value, the more likely the warning message is to be ignored.

Default setting: 5

/proc/sys/net/core/netdev_max_backlog
This gives the maximum number of packets allowed to queue when an interface receives packets faster than the kernel can process them.

Default setting: 300

/proc/sys/net/core/optmem_max
This specifies the maximum buffer size allowed per socket.

/proc/sys/net/core/rmem_default
This is the receive socket buffer's default size (in bytes).

/proc/sys/net/core/rmem_max
This is the receive socket buffer's maximum size (in bytes).

/proc/sys/net/core/wmem_default
This is the send socket buffer's default size (in bytes).

/proc/sys/net/core/wmem_max
This is the send socket buffer's maximum size (in bytes).

/proc/sys/net/ipv4
All of the IPv4 and IPv6 parameters are fully documented in the kernel source documentation. See the file /usr/src/linux/Documentation/networking/ip-sysctl.txt.

/proc/sys/net/ipv6
Same as IPv4.

/proc/sys/vm

/proc/sys/vm/buffermem
This controls the amount of the total system memory (as a percent) that will be used for buffer memory. It holds three values that can be set by writing a space-separated list to the file:

1. Minimum percentage of memory that should be used for buffers
2. The system will try and maintain this amount of buffer memory when system memory is being pruned in the event of a low amount of system memory remaining
3. Maximum percentage of memory that should be used for buffers

Default setting: 2 10 60

/proc/sys/vm/freepages
This controls how the system reacts to different levels of free memory. It holds three values that can be set by writing a space-separated list to the file:

1. If the number of free pages in the system reaches this minimum limit, only the kernel will be permitted to allocate any more memory.
2. If the number of free pages in the system falls below this limit, the kernel will start swapping more aggressively to free memory and maintain system performance.
3. The kernel will try to keep this amount of system memory free. Falling below this value will start the kernel swapping.

Default setting: 512 768 1024

/proc/sys/vm/kswapd
This controls how the kernel is allowed to swap memory. It holds three values that can be set by writing a space separated list to the file:

1. Maximum number of pages the kernel tries to free at one time. If you want to increase bandwidth to/from swap, you will need to increase this number.
2. Minimum number of times the kernel tries to free a page on each swap.
3. The number of pages the kernel can write in one swap. This has the greatest impact on system performance. The larger the value, the more data can be swapped and the less time is spent disk seeking. However, a value that is too large will adversely affect system performance by flooding the request queue.

Default setting: 512 32 8

/proc/sys/vm/pagecache
This does the same job as /proc/sys/vm/buffermem, but it does it for memory mapping and generic caching of files.

Friday, June 23, 2006

High-capacity NAS device on tap from Procom

IRVINE, CALIF. - Procom Technology is expected to launch a new high-end, network-attached storage appliance this week that lets heterogeneous enterprise customers share, consolidate and manage their storage resources.

The NetForce 3100HA is a scalable, high-availability NAS device with an initial capacity of more than four terabytes that customers can grow as their storage requirement increases. This can be done by inserting 36G- or 73G-byte drives into the rack-mount enclosure without taking the system down. The system also has fault-tolerant features such as redundant fans and RAID controllers. To connect it to the network, the NAS appliance has a 10/100/1000M bit/sec Ethernet adapter.

The NetForce is the entry-level model of Procom's storage family. In Windows NT networks it makes use of access control lists (ACL) and NT's multiple master domain architecture. ACLs are lists of users who are allowed to access the server and the access rights they have; the multiple master domain architecture is used in geographically separated midsized and large corporations to house the security and access rights for users.

The NetForce supports the Unix Network File System and Microsoft's NFS, as well as the Network Data Management Protocol, the newest standard for LAN-free backup. It is designed to scale to over 16 terabytes.

The NetForce will compete against file servers from Network Appliance and EMC. The Network Appliance 840 scales to over 4.5 terabytes. EMC's ip4700 has an upper capacity of 3.6 terabytes.

But it was the new device's easy installation and cost that attracted Varco, an oil and gas company in Houston.

"We put our [enterprise resource planning] system on a Network Appliance server originally," says Cory Lucas, network administrator for Varco. "It took a long time to install and was complex. We looked at a couple of alternatives, but they didn't offer us the storage capacity we wanted. The 3100 was a 15-minute install into our Windows NT environment at one-third the price of the Network Appliance product." Lucas says.

The NetForce 3100HA NAS appliance is available starting at $42,000.

Procom: www.procom.com

Benefits of NAS

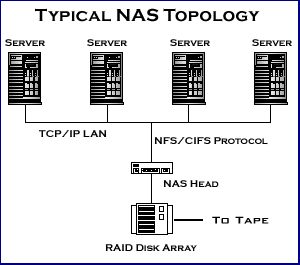
- Almost any machine that can connect to the LAN (or is interconnected to the LAN through a WAN) can use NFS, CIFS or HTTP protocol to connect to a NAS and share files.
- A NAS identifies data by file name and byte offsets, transfers file data or file meta-data (file's owner, permissions, creation data, etc.), and handles security, user authentication, file locking
- A NAS allows greater sharing of information especially between disparate operating systems such as Unix and NT.
- File System managed by NAS head unit
- Backups and mirrors (utilizing features like NetApp's Snapshots) are done on files, not blocks, for a savings in bandwidth and time. A Snapshot can be tiny compared to its source volume.

what is NAS


Introduction to NAS - Network Attached Storage

Dedicated network devices provide affordable, easy access to data

Several new methods of utilizing computer networks for data storage have emerged in recent years. One popular approach, Network Attached Storage (NAS), allows homes and businesses to store and retrieve large amounts of data more affordably than ever before.
Background
Historically, floppy drives have been widely used to share data files, but today the storage needs of the average person far exceed the capacity of floppies. Businesses now maintain an increasingly large number of electronic documents and presentation sets including video clips. Home computer users, with the advent of MP3 music files and JPEG images scanned from photographs, likewise require greater and more convenient storage.

Central file servers use basic client/server networking technologies to solve these data storage problems. In its simplest form, a file server consists of PC or workstation hardware running a network operating system (NOS) that supports controlled file sharing (such as Novell NetWare, UNIX® or Microsoft Windows). Hard drives installed in the server provide gigabytes of space per disk, and tape drives attached to these servers can extend this capacity even further.

File servers boast a long track record of success, but many homes, workgroups and small businesses cannot justify dedicating a fully general-purpose computer to relatively simple data storage tasks. Enter NAS.

What Is NAS?
NAS challenges the traditional file server approach by creating systems designed specifically for data storage. Instead of starting with a general-purpose computer and configuring or removing features from that base, NAS designs begin with the bare-bones components necessary to support file transfers and add features "from the bottom up."

Like traditional file servers, NAS follows a client/server design. A single hardware device, often called the NAS box or NAS head, acts as the interface between the NAS and network clients. These NAS devices require no monitor, keyboard or mouse. They generally run an embedded operating system rather than a full-featured NOS. One or more disk (and possibly tape) drives can be attached to many NAS systems to increase total capacity. Clients always connect to the NAS head, however, rather than to the individual storage devices.

Clients generally access a NAS over an Ethernet connection. The NAS appears on the network as a single "node" that is the IP address of the head device.

A NAS can store any data that appears in the form of files, such as email boxes, Web content, remote system backups, and so on. Overall, the uses of a NAS parallel those of traditional file servers.

NAS systems strive for reliable operation and easy administration. They often include built-in features such as disk space quotas, secure authentication, or the automatic sending of email alerts should an error be detected.

NAS Protocols
Communication with a NAS head occurs over TCP/IP. More specifically, clients utilize any of several higher-level protocols (application or layer seven protocols in the OSI model) built on top of TCP/IP.

The two application protocols most commonly associated with NAS are Sun Network File System (NFS) and Common Internet File System (CIFS). Both NFS and CIFS operate in client/server fashion. Both predate the modern NAS by many years; original work on these protocols took place in the 1980s.

NFS was developed originally for sharing files between UNIX systems across a LAN. Support for NFS soon expanded to include non-UNIX systems; however, most NFS clients today are computers running some flavor of the UNIX operating system.

The CIFS was formerly known as Server Message Block (SMB). SMB was developed by IBM and Microsoft to support file sharing in DOS. As the protocol became widely used in Windows, the name changed to CIFS. This same protocol appears today in UNIX systems as part of the Samba package.

Many NAS systems also support Hypertext Transfer Protocol (HTTP). Clients can often download files in their Web browser from a NAS that supports HTTP. NAS systems also commonly employ HTTP as an access protocol for Web-based administrative user interfaces.
Hello all,

I am working in one of good software company as linux expert. IT market is little changing for new ppls who are interested linux administration or network stuffs,
you even I am doing the same from few years but right I am not getting much satisfaction from this job. Thats ppl should think to get into it, rather than you can go for storage domain for example SAN and NAS.
and I am going to post some basic and adavance stuffs bout SAN and NAS, Belive me guys if you want to make money, want to get job, want to get satisfaction then learn bout SAN and NAS and get good job.
and you know every corporate having storage for their database,
so move on for storage administration...dont worry its part of system administration linux always be there.

then enjoy new posts
UniLinux

Thursday, June 01, 2006

New ATI drivers for Linux

yamla writes "ATI has finally released new Linux drivers that claim support for the Radeon and Radeon Mobility 1x00 graphics cards, more than six months after releasing the chips. Read the release notes here. Any reviews are welcome."
New Product Support

Radeon X1900 series
Radeon X1800 series
Radeon X1600 series
Radeon X1300 series
Mobility Radeon X1800
Mobility Radeon X1600
Mobility Radeon X1400
Mobility Radeon X1300

Resolved Issues

Quake 3: Texture corruption is no longer noticed when playing the game on systems containing an ATI Radeon® 8x00, Radeon® 9000, Radeon® 9100, Radeon® 9200, or Radeon® 9250 product
The ATI Installer no longer inconsistently backs up and recovers existing XF86 and Xorg config files.
The ATI Uninstaller /usr/share/fglrx/fglrx-uninstall.sh, can now be executed from any path

Build Spam Filter for Linux

Overview
1. Build bare-bones Linux server
a. Custom Configurations
b. Partitions
c. Firewall Option
d. Package Selection
e. LANG variable

2. Install Postfix Message Transfer Agent (MTA)
a. Disable sendmail
b. Install Postfix
c. Configure Postfix
d. Test Postfix
e. Configure for mail forwarding
f. Test again

3. Install Mailscanner
a. Install MailScanner Package
b. Initial MailScanner Configuration

4. Install Spamassassin
a. Install SpamAssassin
b. Configure SpamAssassin

5. Install ClamAV
a. Install ClamAV
b. Configure ClamAV
c. Test ClamAV
Step I - Build Bare-Bones Linux Server
I've used some of the fairly recent versions of RedHat Linux. Versions 8, 9 or Fedora should work fine. I choose the custom build using the GUI installer.

a. Custom User Configurations
Select the generic selections for keyboard, language and timezone.

b. Partitions
You should partition the server with at least this layout: / /usr /varThis will protect your server from runaway log files.

c. Firewall Configuration
I chose to select the "no firewall" option. I consider this device to be a traffic management device and not a security device. Upstream security should be handeld by an actual firewall. Of course, many may disagree with this and choose to load IPTables. Just make sure you have the right chains configured to allow traffic to flow properly.

d. Package Selection
When you get to the package selections, DE-SELECT EVERYTHING. Go back and choose only the following items:

Editors -> you'll need this to vi files
Development Tools -> you'll need this to compile software

Once the machine builds itself, it will reboot.

e. Fix LANG Variable
Once it reboots, we need to edit the LANG variable. RedHat's LANG variable setting of LANG="en_US.UTF-8" can cause compilation errors in some perl code used by MailScanner and SpamAssassin.

In Red Hat Linux you must edit the file /etc/sysconfig/i18n to change the lines:
LANG="en_US.UTF-8" SUPPORTED="en_US.UTF-8:en_US:en" To: LANG="en_US" SUPPORTED="en_US.UTF-8:en_US:en"You then need to re-set and export the LANG variable: [root@titan sysconfig]# LANG='en_US' [root@titan sysconfig]# export LANGStep II - Install Postfix
I chose to use postifx instead of sendmail for my MTA. I like postfix because its configuration is very understandable. Also, I believe it is a bit more lightweight than sendmail.

a. Disable existing Sendmail services
Before you install postfix, you need to disable the existing sendmail items running on your Linux box. Service sendmail stop chkconfig sendmail offb. Install Postfix
Download postfix 2.1.5 from www.postfix.org and install as per this postfix document. Make sure you add the required records in passwd, group and aliases files. Postfix and Mailscanner will not work without them!

Accept all of the default settings when you "make install"

c. Configure Postfix
Postifx has two files which control most of its functionality. These are main.cf and master.cf.

Specific main.cf edits: myhostname = titan.corp.com mydomain = corp.com myorgin = $mydomain inet_interfaces = all mydestination = $myhostname, localhost.$mydomain $mydomain mynetwork_style = hostNote: some of these items need to be changed, while some only need to be uncommented.

d. Test Postfix Build
It is very importiant to test postfix now to make sure everything works.

Send an email to this mail server. You can telnet on port 25 to this box and manually send an email.

e. Configure Postfix to forward email
Since we do not want this device to be the final destination for our mail, we need to configure Postfix to forward all mail for our domain to our SMTP mail server. We need to make sure that only mail for our domain is forwarded, and mail for other domains is dropped (do not become a open mail relay - very bad!)

Edit this item in main.cf relay_domains = lab.netThis tells Postfix which domains it should relay mail. All mail destined for this doamin (and only this domain) will be forwarded to its remote SMTP server. You can put multiple domains here, just seperate them with a comma or whitespace.

Add line to end of main.cf transport_maps = hash:/etc/postfix/transportThis tells Postfix what method to use to resolve the destination address for relayed mail:

Add line to end of "/etc/postfix/transport" lab.net smtp:[192.168.2.225]This command specifically maps the domain "lab.net" to the IP address 192.168.2.225 and tells Postfix to use SMTP as the transport. All mail destined for lab.net which is relayed thru this Spam Gateway will be forwarded via SMTP to 192.168.2.225.

Then run command: postmap /etc/postfix/transportThis command builds the hash table/file which Posfix will use to forward mail. If you don't do this, it wont work.

Finally add this line to main.cf append_at_myorigin = noThese lines will make sure your Spam Gateway does not add any of its own header domain info to the mail as it passes thru.

f. Test Again
Stop and start postfix to make sure all changes take. postfix stop postfix startI know this is redundent, but you really should test your system again before installing MailScanner. Make sure that mail gets passed thru the system wihtout problem. If you do encounter a problem, it will be alot easier to fix it now than after you've installed MailScanner, SpamAssassin and ClamAV.
Step III - Install MailScanner


a. Install MailScanner
MailScanner installation is very easy to install. Just download the package from http://mailscanner.info. I use the version for RedHat/Mandrake.

Place the tar file in you directory of choice then run: tar zxvf MailScanner-.tar.gzRun the install script: ./install.shUse chkconfig to make sure MailScanner is set for the proper run levels. chkconfig --list | grep MailScannerYou should see: MailScanner 0:off 1:off 2:on 3:on 4:on 5:on 6:offAlso, you'll need to disable postfix via chkconfig. MailScanner starts postfix itself. chkconfig postfix offb. Configure MailScanner Settings

Updates to postfix's main.cf by adding this line: header_checks = regexp:/etc/postfix/header_checks In the file /etc/postfix/header_checks add this line: /^Received:/ HOLDHere are the edits to Mailscanner - place / update in /etc/MailScanner/MailScanner.conf Run As User = postfix Run As Group = postfix Incoming Queue Dir = /var/spool/postfix/hold Outgoing Queue Dir = /var/spool/postfix/incoming MTA = postfixHere's some file permissions changes you'll need to make: chown postfix.postfix /var/spool/MailScanner/incoming chown postfix.postfix /var/spool/MailScanner/quarantineIts a good idea to test the server now. Send a message to the remote server and see if it goes thru. It should, and then you can move to installing SpamAssassin.
Step IV - SpamAssassin
a. Install SpamAssassin
SpamAssassin is also very easy to install, however, you need to make sure you have the proper PERL modules installed. They are: Digest::SHA1 HTML::ParserOptional Modules: MIME::Base64 DB_File Net::DNS Mail::SPF::Query Time::HiResYou can install SpamAssassin with: perl -MCPAN -e 'install Mail::SpamAssassinThen install Net::DNSb. Configure SpamAssassin
You don't need to edit any of the SpamAssassin conf files because all of the configuration is done thru MailScanner.

In /etc/MailScanner/MailScanner.conf we will make these changes:
Change this line: Use SpamAssassin = noto: Use SpamAssassin = yesUpdate the SpamAssassin User State Dir setting: SpamAssassin User State Dir = /var/spool/MailScanner/spamassassinand then run commands: mkdir /var/spool/MailScanner/spamassassin chown postfix.postfix /var/spool/MailScanner/spamassassinRestart MailScanner to make changes stick. service MailScanner restartStep V - ClamAV
a. Install ClamAV
Before you install ClamAV, you need to add the clamav user and group. You can do this as follows: groupadd clamav useradd -g clamav -s /bin/false -c "Clam AntiVirus" clamavOnce this is done, you can build the software.
Open up the package: tar xvzf clamav-0.80.tar.gzGeneric build proceedure: ./configure makeI encountered a problem with my RedHat Fedora Core 3 build which was fixed by using this command "ln -s /usr/lib/libidn.so.11.4.6 /usr/lib/libidn.so". See this web page for details: "http://kb.atmail.com/view_article.php?num=132&title=libidn.so:%20No%20such%20file%20or%20directory" make installNow you need to load the perl modules for the ClamAV perl -MCPAN -e shell install Parse::RecDescent install Inline install Mail::ClamAV b. Configure ClamAV and MailScanner Settings
In /usr/local/etc/clamd.conf make the following edits:

Add '#' in front of the word 'Example'

Do the same in /usr/local/etc/freshclam.conf

Now you need to update ClamAV's virus signature files [root@titus]# freshclam ClamAV update process started at Sat Jan 29 19:43:51 2005 main.cvd is up to date (version: 29, sigs: 29086, f-level: 3, builder: tomek) daily.cvd is up to date (version: 691, sigs: 804, f-level: 4, builder: ccordes)Update MailScanner's configuration file to use ClamAV 'Virus Scanners = clamav'In MailScanner.conf, check the setting of 'Monitors for ClamAV Updates' to ensure it matches the location of your ClamAV virus database files. This should be "/usr/local/share/clamav/*.cvd".

Windows Vista vs Linux servers

Windows vs. LinuxThis article will not attempt to advocate the use of Linux over Windows or vice versa. I will try to present the differences and similarities between Linux and Windows in a fair manner.
Overview:
Both Linux and Windows (2000, NT, XP, Vista) are operating systems. Linux was inspired from Unix, while Windows was inspired from VMS.

While no single company "owns" Linux, Windows is owned by Microsoft. Various distributions (often referred to as "distros") of Linux come from different companies (e.g. Red Hat, Novell SuSE, Mandrake etc.), while all Windows flavors (95, 98, 2000, XP, Vista) come from Microsoft.

Both Linux and Windows come in Desktop and Server editions.

Cost:
As far as cost is concerned, Linux is very cheap or free. I used the word "very cheap" for enterprise users. While anybody can download, install and use Linux, the distribution companies usually charge for technical support. Windows is expensive. You first pay for the copy of the software and then again for the technical support if you ever want it. There is another catch though; Windows enforces you to use a single copy on a single computer. This is not the case with Linux though, once you purchase Linux, you can run it on an unlimited number of computers.

GUI:
Both Windows and Linux are GUI based operating systems. I'm afraid but, Windows has better GUI than Linux and it will get far better with the upcoming Windows Vista release. Linux has two GUIs: Gnome and KDE. Linux is fast catching up and is evolving from a server operating system to a desktop operating system.

Command Line:
Both Windows and Linux comes with command line interface. Windows calls it the "DOS prompt", while Linux refers to it as the "shell". Linux's shell is far more superior than Window's DOS prompt. It can do a whole lot of things that are not possible in Windows. Linux support various command line shells such as BASH, Bourne, Korn, C shell and many other.

Third Party Application Software Availability:
Both Windows and Linux run third-party applications. Windows, compared to Linux, has far greater number of third party applications available for use. A program written for Windows will not run under Linux (although it can be made to emulate, but it will be very annoying and hence not recommened).

Linux's application base is, however, increasing threefold. On a more close examination, the average computer user uses the following applications 90% of the time: Word Processor (Office suite), E-mail client, Web browser, Media software, and Instant Messenger. Linux has all these applications and in fact has many flavors for each.

Like Linux, all third party applications are very cheap or free. Whereas, Windows applications can cost a leg and a limb.

Security:
Simply put it this way, Windows is not secure. If you are using Windows and don't have Antivirus, Anti Spyware, and firewall (memory and resource eating applications), your computer can get affected by a virus in less than 10 minutes. I remember restoring a fresh copy of Windows XP on my Toshiba A40 notebook. I was browsing the Internet with Microsoft Internet Explorer and my machine got infected with loads of spyware in less than 15 minutes!

Microsoft came up with Firewall and Anti Spyware products, but these programs run in the background and eat up your computer's precious memory.

Linux, on the other hand, doesn't have these issues. I'm not aware of any spywares for Linux. One can safely run a Linux distro without ever worrying about installing Anitvirus or Anti-Spywares.

Windows also has more security flaws than Linux. By security flaw, I mean a hacker can compromise the Windows operating system and break into your machine and destroy your files. But, flaws on Windows are quickly fixed and patches are often made available almost instantly after the flaw is reported.

Supported Hardware:
Windows was originally designed for Intel based machines. Earlier version of Windows NT also ran on RISC and Alpha architectures, but not anymore. Linux run on a wide variety of hardware. And can support some very old legacy hardware. I've seen a Linux distro running on a 486 based machine.

Diver Availability:
As one author once said, "Windows is a bag of drivers". I think that is quite true. Installing a new hardware device is a piece of cake in Windows, whereas it can be a nuisance on Linux especially for average Joe. I can't in my wildest dreams imagine my dad installing a sound card successfully in Linux.

Things however will not stay the same for long. Manufacturers are also offering Linux drivers for their hardware, which will simplify the process.

Network Support:
Linux beats Windows bad in this area. Windows was never designed for the Internet. Unix, on which Linux is based, was designed for Internet (or Network) and is far more efficient compared to Windows. A senior Network Administrator working for a Fortune-500 company, recently pointed to me that if we monitor the traffic between exchange Windows based Exchange Server and Client, we can see that hundreds of packets are going to and from even when both are idle. He said that such is not the case with Linux.

However, our average Joe will never see or feel any difference. Windows Internet is good enough for him.

File System:
Windows Vista will use a new file system called WinFS. Earlier version used FAT (FAT16 and FAT32) and NTFS file systems, with NTFS being the preferred choice. Linux supports ext2 and ext3 file systems.

FAT file systems were mediocre, but NTFS can be compared with the Linux file systems.

Both file systems allows us to create directories, sub directories and file. Linux file systems are case-sensitive whereas, NTFS is not.

Normally, Linux systems cannot access NTFS file systems, but with the help of add-on software, it can.

Help and Documentation: Linux help and documentation is quite good, accurate and to the point compared.

I've been using Windows for well over 8 years now. Frankly speaking, I hardly ever checked the accompanying documentation or the help file because everything is so simple that nobody needs to venture in the help file.

What should I buy?
OK. Truth hurts, but let it be. If you are average Joe, that extra $300 on Windows are worth spending. If you are looking an OS for your server, never even think about Windows. Buy Linux.

LDAP for authentication

Authenticating to a LDAP serverReasons for authenticating to an LDAP server.


We assume that you would like to create a web server where a client can log in and then retrieve their e-mails via internet and/or send e-mails etc. (example: www.gmx.de, www.web.de or http://linuxali.dyndns.org:4141 ).

Therefore the client has to become a user on the web server. That means they have to run the web server as root (not recommended) to be able to use the commands useradd and groupadd. Your second option is to put all users into a database, where the system looks at every login and controls individual access if the user exists.

This second opportunity is safer as you have one single location in the network where all users log in (like the NDS from Novell); you can administrate the users at a central point (Single Point of Administration).


Necessary software

OpenLDAP 2.x.x (http://www.openldap.org/software/download/) (In this tutorial OpenLDAP 2.0.12 is used)


Nss_ldap (http://www.padl.com/nss_ldap.html)

Pam_ldap (http://www.padl.com/pam_ldap.html)

Pam-devel (http://www.tuxfinder.com) (only necessary if you did not compile PAM yourself)

Debian users only need the package libpam0g-dev ("apt-get install libpam0g-dev")

OpenLDAP should already be completly configured; if it is not and you have problems look for the tutorial by Thomas Kroll (http://www.linuxnetmag.com/de/issue6/m6ldap 1.html)


Installing the software

First, decompress the packages nss_ldap and pam_ldap by:

>> tar xvfz nss_ldap....tar.gz
>> tar xvfz pam_ldap....tar.gz

Then compile and install them by:
>> ./configure
>> make
>> make install

in each directory.

Installation time will depend on your computer.


Configuring the software

In order to store the following objects, for the LDAP account, you have to adapt the file slapd.conf ( it is in the configuration directory of OpenLDAP).

It should look like this:

Slapd.conf

include /etc/openldap/schema/core.schema
include /etc/openldap/schema/cosine.schema
include /etc/openldap/schema/nis.schema
include /etc/openldap/schema/inetorgperson.schema

# These are the files which define the objects
# that are included before starting the server.
# These entries must be changed.

# The following files should already be present,
# otherwise the LDAP server would not work properly.

pidfile /usr/local/var/slapd.pid
argsfile /usr/local/var/slapd.args

# This data is necessary for starting the LDAP server.

database ldbm
suffix "dc=alkronet,dc=de"

# This entry determines the highest object in your LDAP database.
# This value must be adapted.

rootdn "cn=Manager,dc=alkronet,dc=de"

# This entry determines a person who has all permissions
# for the following object in the LDAP database.
# This value must be adapted.

rootpw test

# The root password.

directory /usr/local/var/openldap-ldbm

# Directory with the LDAP database.

defaultaccess write

# Standard permissions for every user.

# Indices to maintain
index objectClass eq


The file /etc/ldap.conf must also be adapted because the programs nss_ldap and pam_ldap are accessing it (Be careful, do not edit the file: /etc/openldap/ldap.conf). It is also possible that the files are in a different place. If you use the option -sysconfdir= ... at configuration time, the files will reside in the corresponding directory.


Ldap.conf
host 127.0.0.1
# host where you can reach the LDAP server

base dc=alkronet,dc=de

# the base of the LDAP server

pam_filter objectclass=posixAccount

# At log in all objects which are contained in the object class
# posixAccount are searched for the user

pam_login_attribute uid

# also those which have the attribute uid

nss_base_passwd o=auth_user,dc=alkronet,dc=de?one
nss_base_shadow o=auth_user,dc=alkronet,dc=de?one
nss_base_group o=auth_group,dc=alkronet,dc=de?one

# names the LDAP place where the account data must be

sslno

# ssl connections = no


Afterwards a file should be created where an organizations container object is put in. This file could look like the following:


User.ldif
dn: o=auth_user, dc=alkronet, dc=de
o: auth_user
objectclass: organization

# these lines create an organizations object
# which is named "auth_user". Later, new
# users will be inserted in this object.

dn: o=auth_group, dc=alkronet, dc=de
o: auth_group
objectclass: organization


dn: cn=user, o=auth_group, dc=alkronet, dc=de
objectClass: posixGroup
objectClass: top
cn: user
userPassword: {crypt}x
gidNumber: 10

# here the group "user" with the number 10 is created

dn: uid=tester, o=auth_user, dc=alkronet, dc=de
uid: tester
cn: Test Tester
objectclass: account
objectclass: posixAccount
objectclass: top
objectclass: shadowAccount
userPassword: test
shadowLastChange: 11472
shadowMax: 99999
shadowWarning: 7
uidNumber: 1000
gidNumber: 10
homeDirectory: /home/tester
loginShell: /bin/bash

# uid = user- und login name
# cn = christian name, surname would be sn
# afterwards the object classes are defined
# for the quite tricky values with shadow*
# the manpages of passwd, useradd and
# shadow should probably be consulted
# uidNumber = user number or user id
# gidNumber = group number or id the user belongs to
# homeDirectory = home directory
# loginShell = login shell


After this file is created it can be added to the LDAP server.

This is done with the command ldapadd.

>> ldapadd -x -D "cn=manager, dc=alkronet, dc=de" -W -f User.ldif

Now the user is included in the LDAP database but the database is not accessed during log in.

So the PAM service must be adapted to the LDAP server.

Preparing the system for authenticating to a LDAP server

First /etc/nsswitch.conf must be edited to tell the system that group-, user- and password information is not only held in files but also on a LDAP server.

This could look like the following:


/etc/nsswitch.conf
passwd: ldap files
group: ldap files
shadow: ldap files

# ldap was added here

hosts: files dns
networks: files
protocols: db files
services: db files
ethers: db files
rpc: db files
netgroup: nis


If you compiled the packages nss_ldap and pam_ldap yourself, a file named ldap.conf should exist in the directory /usr/local/etc. If it is not, the option -sysconfdir was used at compile time. You should look in the directory you chose then.

Debian users who have worked with apt-get own the two files pam-ldap.conf and libnss-ldap.conf. These files are the same and you could also create a link (e.g.: ln -snf /etc/pam-ldap.conf /etc/libnss-ldap.conf).

The content of this file determines which LDAP server to authenticate to and which objects contain the user- and password information.

It could look like the following:

Ldap.conf oder ldap-pam.conf

host 127.0.0.1
# IP des LDAP Servers

base dc=alkronet,dc=de
# base object of the server

# binddn cn=proxyuser,dc=padl,dc=com
# bindpw secret
# rootbinddn cn=manager,dc=padl,dc=com
# port 389

# if you have to authenticate to the LDAP server to be able
# to browse data, the user and password have to be
# named here

# timelimit 30
# sets how long a user is allowed to browse the LDAP server

# bind_timelimit 30
# sets how long a user is allowed to be connected
# to the LDAP server

# idle_timelimit 3600
# sets the time the connection is automatically cut
# when the user is idle

pam_filter objectclass=posixAccount
# search all entries where the object class equals posixAccount

pam_login_attribute uid
# the username is stored in the attribute uid

nss_base_passwd o=auth_user, dc=alkronet,dc=de?one
nss_base_shadow o=auth_user, dc=alkronet,dc=de?one
nss_base_group o=auth_group, dc=alkronet,dc=de?one

# sets the path to the passwords, the shadow entries and the
# group information
# ?one means, that only one entry may be used
# if there is more than one entry the first found
# password is used

sslno
# SSL connections are not supported


Furthermore the configuration files of every service that is running on the system that will authenticate to the LDAP server must be adapted.

The configuration files reside in /etc/pam.d. Some examples are already included with the PAM software and can be found in example.

If you did not compile PAM yourself they should be in /usr/share/doc/pam, /usr/share/doc/packages/pam or /usr/share/doc/libpam.

The file that is accessed during log in is named login and could look like this:


/etc/pam.d/login
auth required /lib/security/pam_securetty.so
auth required /lib/security/pam_nologin.so
auth sufficient /lib/security/pam_ldap.so use_first_pass
auth required /lib/security/pam_unix_auth.so try_first_pass
account sufficient /lib/security/pam_ldap.so
account required /lib/security/pam_unix_acct.so
password required /lib/security/pam_cracklib.so
password required /lib/security/pam_ldap.so
password required /lib/security/pam_pwdb.so use_first_pass
session required /lib/security/pam_unix_session.so

# /lib/security/pam_ldap.so should be available
# for every section (auth, account, password) now

# use_first_pass means that the first entered password is used
# and the files (shadow and passwd) are omitted


The other files in the directory can also be adapted this way; or you could take the example files from PAM.


Now logging in should be working, but I had to reboot (perhaps some services must be restarted).


PHP script for adding users

add_user.php
$username = testuser;
$password = testuser;
$user_id = 1005;

$ldap_server = "127.0.0.1";
$ldap_base = "dc=alkronet,dc=de";

# Attention: Double user ids could lead to authenticating errors

$entries["uid"]=strtolower($username);
$entries["cn"]=$username;
$entries["objectclass"][0]="account";
$entries["objectclass"][1]="posixAccount";
$entries["objectclass"][2]="top";
$entries["objectclass"][3]="shadowAccount";
$entries["userPassword"]=$password;
$entries["shadowLastChange"]="11472";
$entries["shadowMax"]="99999";
$entries["shadowWarning"]="7";
$entries["uidNumber"]=$user_id;
$entries["gidNumber"]="10";
$entries["homeDirectory"]="/home/".$username;
$entries["loginShell"]="/bin/false";

$connect = ldap_connect($ldap_server);
$bind = ldap_bind($connect, "cn=manager, ".$ldap_base, "test");

if (!$bind || !$connect) {
echo "Connection could not be established.";
exit;
}

ldap_add($connect, "uid=".strtolower($username).", o=auth_user, ".$ldap_base, $entries);

if (ldap_error($connect) != "Success") {
echo "

".ldap_error($connect)."

";
}
BIND and ADS

In the real world, corporate networks are usually a heterogeneous mix of different makes and models of computers and services. In my probably typical work environment, we mix a few MS Windows Servers in with many Linux and IBM A/S400 servers. While it would be nice to be a homogeneous network, often times, the software required for business just isn't made for your preferred operating system. Hopefully this brief paper will help integrate your rock-solid "legacy" DNS servers running on *NIX with your Active Directory Domain Controllers.

The key to this is a little used (at least in the BIND DNS world) item called a Service Record, or SRV record. SRV records are intended to relay information via DNS regarding which server is providing which service. The server may be on your local LAN, but it's not required. If a Domain Controller (referred to here after as DCs) is on the same LAN as your workstation, the workstation will use it's own mechanism, a network broadcast, to find the DC so a SRV record may not be absolutely required. If however they are on different networks or LANs, SRV records will be required so the workstations knows where the DC is located. If you've read anything about routing, you probably know this is because the router between the 2 LANs will not forward the workstations broadcast traffic to the DCs LAN. Thus the DC cannot answer the broadcast leaving the workstation isolated on the other side of the router.

Don't be alarmed by the funky syntax, but here is a sample SRV record:

_http._tcp.example.com. SRV 10 5 80 www.example.com.

As you can see an SRV record has several fields and a unique system for naming. The naming system is an underscore followed by the name of the service, followed by a period, an underscore, and then the protocol, another dot, and then the name of the domain. The period at the end of the domain is required in this case. This tells BIND not to append another "example.com" to the name making it "_http._tcp.example.com.example.com". Same goes for the period at the end of the target computer as well.

If the fields were labeled by number left to right in the above example. The fields are:
1. The _service._protocol.domainname
2. The Resource Record. As you can guess, it will always be SRV for Service Records. For other types of records it can be different, eg, for Address Records it will be A instead of SRV.
3. The Priority of 10. This sets the preference for a host specified in the target field. DNS clients that query for SRV resource records attempt to contact the first reachable host of the lowest numbered preference listed here. Although target hosts have the same stated preference value, they can be tried in random order. The range of preference values is 0 to 65535. I keep these at 0 (zero) most of the time to make it simpler.
4. The Weight of 5. Can be used in addition to preference to provide a load-balancing mechanism, where multiple servers are specified in the target field and are all set to the same level of preference. When selecting a target server host among those of equal preference, this value can be used to set an added level of preference that can be used to determine the exact order or balancing of selection for the target hosts used in an answered SRV query. When a non-zero value is used, servers of equal preference are tried in proportion to the weight of this value. The range of values is 1 to 65535. If load balancing is not needed, use a value of 0 in this field to make the record easier to read.
5. The Port Number for the service(80). In the example it is the common port for the http service of 80, but it can be anything. For example, if you run http on port 8888, then you would put 8888 in this field. This particular field was the entire reason SRV records surfaced. They were made to allow clients to know which port a service was running on in case it was running on an unusual port number. The *NIX world thought running common services on unusual ports was a bad idea. As a side effect so SRV records were never embraced and are not commonly used by *NIX admins.
6. The target server. This should match the name given by the Address Record of the target server of course.

The SRV record will go in the forward look-up file. This will be the same file containing the A records. If you see files with Pointer Records (PTR) files, you are in the wrong file.

Ok, now the actual part that makes things work. In order for a workstation to find out which server is the DC, four SRV records are required to complete the deal for each DC. This example is for one domain controller, so the weight and priority fields are set to zero (0). Also, you should be able to see that the LDAP service uses port 389, and the Kerberos service uses port 88.

If you have an Address Record (A) that identifies your server name like this:

dc1.example.com. A 111.222.333.444

Then your SRV records for this DC would be as follows

_ldap._tcp.example.com. SRV 0 0 389 dc1.example.com.
_kerberos._tcp.example.com. SRV 0 0 88 dc1.example.com.
_ldap._tcp.dc._msdcs.example.com. SRV 0 0 389 dc1.example.com.
_kerberos._tcp.dc._msdcs.example.com. SRV 0 0 88 dc1.example.com.

You may notice that there are two LDAP and two Kerberos entries that look similar. One simply tell where the LDAP and Kerberos services are running and the other on tell the client that it is the DC for the listed target domain.

If you have 2 or more DCs you can experiment with the priority and the weight fields, but I'll leave that as an exercise for you.

Hopefully with this little bit of info, you can forgo the hardships of trying to make your legacy system work with MSDNS. Why learn more than you have to when, in this instance, the old way is clearly the best way!

MPM in apache

'Multi Processing Modules', generally called MPMs, are modules that get the primary attention in Apache. Apache has been known for its extensibility through modules and this is one of the main reason that it has been favoured worldwide, apart from its rock stabilty. Modules that can be added at a later stage or when in need makes Apache more stable due to the decreased load.

MPMs are supposed to do the rigorous work of binding to the port specified, accepts the connection requests, generate the child processes according to the load of the server and dispatch the children for the incoming connections. They are loaded along with 'httpd' at startup time. Many a MPM exist, but one and only one can exist in a running Apache installation. The default MPM for Unix is the 'Prefork' module. The default MPMs which exist for other platforms are :

BeOS : beos
Netware : mpm_netware
OS/2 : mpmt_os2
Windows : mpm_winnt

The main difference between MPMs and normal modules is that only one of the former can be used and multiple ones can be loaded in the latter. MPMs must be chosen during install and can be compiled into the binary using the '--with-mpm=NAME' option. If any of the MPMs are not specified, then the default MPM, 'prefork', will be compiled. Apache in Windows is now more efficient since it does not need to use the POSIX compliance and can use the native networking features of the OS. In the Windows environment,the MPM 'mpm_winnt' is used as the default.

Two of the MPMs specified in 'httpd.conf' are 'prefork' and 'worker'. These two MPMs exists for different specifications. The 'worker' MPM was introduced in Apache2. It uses a multiprocess-multithreaded structure. Multi-process means the number of child servers started and multi-threads, the number of connections made by each child-process. The child servers starts the threads according to the directives 'ThreadsPerChild', 'MinSpareThreads' and 'MaxSpareThreads'. By using a threaded structure, each child server can handle more than one connection, upto the limit specified by 'MaxSpareThreads'. The parent process is responsible for starting the child processes. The child instances inturn starts the number of threads specified by 'ThreadsPerChild ' and one additional thread for listening to incoming requests. The main drawback is that it makes more demand on your virtual memory and since one child server handles more than one thread (each thread equals one connection), anything that effects a particular child process has the same effect on the connections. In short, one crashed child process means more than one lost connection. But in the case of 'prefork' module, the concept of threads doesn't exist. A seperate child process get started for each incoming connection, provided within the limit specified. This concept is more geared towards stability since each child process has to handle only its own connection.

'Multi Processing Modules' are just a small part of the really big world of modules in Apache. More about module configuration in the next part. More to come.

Wednesday, May 17, 2006

Beginning with Java on Linux

It seems that you can't go anywhere on the web without running into some form of Java, this is why I am now going to try to explain not only what Java is, but give some examples of programs that you can make, modify and learn from.
What is Java?
Java was originally developed by Sun Microsystems in an attempt to create an architecturally neutral programming language that would not have to be complied for various CPU architectures. Oak (as it was originally called, although the name was changed in 1995) was developed in 1991 for such things as home appliances which would not all run on the same type of processors. Just then the web was taking off and it was obvious that an programming language that could be used for many different operating systems and CPU architectures without compling many times would be of great importance. The final solution was to use bytecode. Unlike C++, Java code is not executable, it is code that is run by a Java Virtual Machine (JVM), so once a JVM is introduced for a platform all the Java programs can be run on it. There are two types of Java programs, the applications and the applets. The applications are what are written on a computer and run on a computer without the Internet connected in anyway. An applet is a program made for use on the internet and is the programs that runs in your browser. Sun also gave Java some buzzwords.
Simple
You might get some arguments from beginners on this, but Java remains a fairly simple language.
Secure
If you ever try to save from a notepad program (or any program) in Java you will get something saying
Quote:
This application has requested read/write access to a file on the local filesystem. Allowing this action will only give the application access to the file(s) selected in the following file dialog box. Do you want to allow this action?
The Java code runs within the JVM and prompts you if the bytecode wants to read or write.
Portable
Since it is architecturally neutral it can run on PCs, Macs, PDAs, Cellphones, and about anything else if there is a JVM for it.
Object-Oriented
While some languages are based around commands, Object-Oriented programming focuses on that data. For a more complete definition I highly recommend going to Google Glossary to learn more.
Robust
Powerful. This is in part due to the fact that the Java complier will check the code and will not complie it if has errors.
Multithreaded[b/]
Java has built-in support for multi-threaded programming.
[b]Architecture-neutral
Java is not made for a specific architecture or operating system.
Interpreted
Thanks to bytecode Java can be used on many different platforms.
High Performace
Java isn't going to be used for 1st person shooters but it does run fast.
Distributed
It can be used on many platforms
Dynamic
Can evolve to changing needs.

How Java is like C/C++
A Java programmer would be able to learn C/C++ quickly and a C/C++ programmer would be able to learn Java quickly because they are similar. When Java was made it was not to be a programming language that was better then C/C++ but was made to meet the goals of the interenet age. Java also has differences with C/C++, for example, someone could not write C/C++ code and complie it as Java for Internet use, nor could someone take Java code and complie it into C/C++.
Getting started writing Java
First you must go and get Java. You can download the JRE, which is the Java Runtime Environment, this is good for using Java but not what we need to compile Java applications. You need to download the SDK, which is the Software Development Kit. Once you have installed this free download you will have two important tools. The first is the javac command which is for compiling the program, and there is the java command for running your program. Once the SDK is installed you try typing javac, if you get an unrecognized error you should put the line
PATH=$PATH:/usr/java/j2sdk1.4.2/bin (or replace /usr/java/j2sdk1.4.2/bin[/i] in whatever is the place to javac (this can be found with locate javac)in your /etc/profile file. This way the commands are accessible from anywhere. For writing the programs, most text editors will work (not word processors though, they format the text) but I prefer Kwrite because after you save it as a java file it colors all the text and makes blocks of code collaspable and expandable. First we are going to do an analysis of a simple program.

/*
This is a simple, simple app.
They will get more fun in time
:)
*/
class First {
public static void main(String args[]) {
System.out.println("Yea! I wrote JAVA");
}
}

Starting at the top you will see the /* and */ markings. This is for a multi-line comment, anything inside of here will be ignored by the Java compiler. You can also add singal line comments with the // markings with everything after the // as a comment.
class is the part of the program that everything is inside of.
First is the title of the program, you have to save it as whatever you have after class, and this case-sensitive.
public is specifying main(String args[]) as being accessable to code outside of its class.
static allows main(String args[]) to be used before any objects have been created.
void Saying that main(String args[]) itself doesn't give output
main(String args[]) { is a method, this is where the code starts executing, you don't need the Sting args for this program but you will need it later so get used to typing it. :)
System.out.println is simply telling the system to print and the ln is telling it to make a new line afterwards. You could also just put print instead of println. Everything in parentheses is where you can type messages.
} The first one is closing the public static void main() { line and the second is closing the class First {.
Once you have this done this, save your file, but make sure to save it as First.java. Next, get a command prompt and go into the folder where you saved your Java file and type
javac First.java
Nothing fancy should happen. If something does, just copy and paste the program off of this document and it should compile fine. Nearly all of my errors with Java are typos that the compiler will let me know about. After this, you should have a file called First.class. Make sure you are in the same directory as First.class and type
java First
and you should see
Yea! I wrote JAVA.
You do not need to include .class when you are running the program.

Next, we get started with variables. Variables can be any sort of things that you assign a value to.

class var {
public static void main(String args[]) {
int v;
v = 5;
System.out.println("v is " + v);
}
}

The output should be v is 5
Since I have already explained most of the things in the previous program I will explain what the new things do.
int v; This is declaring that there will be an integer variable. You must declare a variable before you use it. This variable is call v. The names can be longer then one character and are case sensitive.
v = 5; v is now being assigned the value 5.
System.out.println("v is " + v); Like before, the System.out.println command is being used, everything inside of quotes is what you type. To add the value of v just a the + v outside of the quotes.
Once you have complied the program and ran it you should get.
v is 5
You can also do math with Java programs, like in the next example.

class math {
public static void main(String args[]) {
int a;
int b;
int c;
a = 5;
b = 9;
c = a * b;
System.out.println( a + " times " + b + " is " + c);
}
}

The output will be 5 times 9 is 45
Along with *, you can also use the +, -, and / signs for math. You can also do things like b = b * a where what the variable equals includes itself. The next program demonstrates a loop.

class loop {
public static void main(String args[]) {
double gallons, cups;
for(gallons = 1; gallons <=10; gallons++) {
cups = gallons * 16;
System.out.println(gallons + " gallons is " + cups + " cups.");
}
}
}

The output will be

1.0 gallons is 16.0 cups.
2.0 gallons is 32.0 cups.
3.0 gallons is 48.0 cups.
4.0 gallons is 64.0 cups.
5.0 gallons is 80.0 cups.
6.0 gallons is 96.0 cups.
7.0 gallons is 112.0 cups.
8.0 gallons is 128.0 cups.
9.0 gallons is 144.0 cups.
10.0 gallons is 160.0 cups.

The first thing different about this program is double instead of int. Int declares an integer, these work for a lot of things but loose precision if you were to divide 9 by 2, or dealing with anything that has a decimal. For things with decimals you can use float or double. There are also different types of integers other then int. Int is 32 bits, so it covers from 2,147,483,647 to -2,147,483,648. As its name suggests, long is a very long integer, 64 bit, it can handle numbers slightly over 9,200,000,000,000,000,000 and slightly under the negative. For the smaller numbers you might want to look into short (16 bit, 32,867 through -32,768) and byte(8 bit, 127 through -128). And for characters, you use char.
Getting back on track, the next thing you will notice it the two variables being declared are separated by a comma. This saves time, I can write
double a, b, c, d;
instead of writing out
double a;
double b;
double c;
double d;
The line with for is the loop itself. The basic form of for is for(starting; restrictions; count by) statement;
The gallons = 1; is saying we want the loop starting at 1. You could start it at 57 or -23 if you wanted. gallons <= 10; is saying count everything less then or equal to 10. Here are some important things that will come in handy many times
== equal to
!= not equal to
< less than
> greater than
<= less than or equal to
>= greater than or equal to
And gallons++ is the same as writing out count = count+1 If you want to count by 2s use count = count+2 or 3s use count = count+3 and so on. The { starts a new block of code, inside we assign cups the value and what to display when the loop is complete.
This next program will use the if statement.

class ifif {
public static void main(String args[]) {
double a, b;
a = 5
b = 4
if(a == b) System.out.println("Since 4 will never equal 5 this won't be displayed, if it does, buy a new CPU");
if(a != b) System.out.println("Since 4 isn't equal to 5 this will be displayed");
if(a < b) System.out.println("5 isn't less then 4, this will not be seen");
if(a > b) System.out.println("I think you get it by now");
}
}

If statements are very useful in all types of situations. The if statement can also be used as a block of code, for example

if(5 == 5) {
double e;
e = 5;
System.out.println("e is " + e);
}
This may not seem like a very useful tool, but in time it will become very important. Say for example, you are writing a temperature conversion program. You want to prompt the user "Press A to convert Fahrenheit to Celsius or B to convert Celsius to Fahrenheit" You would have something like
if(input == A) {
Here is the program to convert Fahrenheit to Celsius
}
if(input == B {
Here is the program to convert Celsius to Fahrenheit
}
This way only the code needed is executed. Of course, you won't actually use [i]input, that is just easy to understand for now.
Here is a program that uses user input to find weight on the moon.

import java.io.*;
class moon {
public static void main(String args[])
throws java.io.IOException {
double e;
double m;
System.out.println("Please enter your weight to get the moon equivalent.");
String strA = new BufferedReader(new InputStreamReader(System.in)).readLine();
e = Double.parseDouble(strA);
m = e * .17;
System.out.println("Your weight on the moon would be " + m + " pounds");
}
}

This one is more complex. import java.io.*; is bringing in things needed for input. The throws java.io.IOException is for error handling. String strA = new BufferedReader(new InputStreamReader(System.in)).readLine(); is going to get the input and the next line is going to assign e the input. From there it is easy. So knowing most of this you can create simple, but useful applications like this.

import java.io.*;
public class triangle {
public static void main(String args[]) throws java.io.IOException {
double a;
double b;
double c;
System.out.println("A is? "); //asking for a
String strA = new BufferedReader(new InputStreamReader(System.in)).readLine();
a = Double.parseDouble(strA);
System.out.println("B is? "); //asking for b
String strB = new BufferedReader(new InputStreamReader(System.in)).readLine();
b = Double.parseDouble(strB);
System.out.println("C is? "); //asking for c
String strC = new BufferedReader(new InputStreamReader(System.in)).readLine();
c = Double.parseDouble(strC);
if(c == 0) { //the block that finds out what c is
b = b * b; //getting b squared
a = a * a; //getting a squared
c = a + b; //a squared + b squared equals c squared
double x=Math.sqrt(c); //finding the square root
System.out.println("C is " + x); //telling what c is
}
if(b == 0) {
c = c * c;
a = a * a;
b = a - c;
if(b <= 0) b = b * -1; //ensuring that the program will not to try to find the square root of a negative number
double y=Math.sqrt(b);
System.out.println("B is " + y);
}
if(a == 0) {
b = b * b;
c = c * c;
a = c - b;
if(a <= 0) a = a * -1;
double z=Math.sqrt(a);
System.out.println("A is " + z);
}
}
}

You get prompted for A,B and C side of a right triangle, if you don't know one side, enter in 0 for that one. The only new stuff is double x=Math.sqrt(c); this is just declaring x and at the same time saying it is the square root of c. Thanks to
moeminhtun on help with the input. This is only scratching the surface of what can be done with Java so here are some more sources that have great information.
Sun has some a lot of documentation on there website.
Java 2: A Beginner's Guide is a great book. This is not a for Dummies book though. It has a steeper, yet easy to follow learning curve. On the right hand side of this page you will also see a link called "Free downloadable code", download this code and look though it, you can learn a lot.
A complete explanation of the Java buzzwords
Some more information from Sun
Beginning Java 2 SDK 1.4 Edition
Learn to program with Java